Showing posts with label boatbuilding. Show all posts

Monday, October 29, 2012

Building a Nutshell Pram - Small Scale


Helping my BBBS Little Brother to build his first boat - a 1/16th scale nutshell pram.  Here he is roughing out the templates from pinpricks of the plans.


And here the young gentleman is cutting the template out on a beautiful old scrollsaw I inherited from my grandfather.

Sunday, September 16, 2012

Maiden Voyage of the Amanda Louise

Sept 15 - tested her out on WBL.  Actually got the sails up and the daggerboard down.  She handles very well in light winds, and rows quite comfortably as well.  I do like the oars as compared to a motor as they're easy to swing down if you have to get moving or need a bit of help shifting tacks (which you may in a very light wind.)  No engine to get started/monkey with.

I would definitely recommend an extra set of oarlocks (which I installed on mine,) as they allow you to a convenient spot to stow the oars while you're under sail.  Would also recommend adjusting the tiller so it swings... if you go with the recommended build, whoever sits in the back is going to have to constantly shift to get out of its way.  Only major concern is the fact that the sail obstructs the view, a problem we resolved by occasionally ducking around it.

Monday, September 3, 2012

Successful Float Test!

... on Typo Lake.  The dagger board trunk is finally not bleeding water from the corners.  Read something on one of the wooden boat forums about using pressure (think they recommended a blow dryer) to cram caulk or resin up into a leak.  After sanding down with a shim covered in paper towels and sandpaper, I applied 3M 5800 caulk liberally both around the outside of the bedlogs as well as the inside of the trunk/seam of the hull and bedlogs/anywhere that looked like it could leak.

I then applied a duct tape patch to the daggerboard socket at the bottom of the boat and the top of the trunk, leaving just enough room for a duct tape-wrapped tube, which I connected to a shop vac.  I threw the shop vac on reverse, and while there were a few leaks allowing the air to get out (which I wanted... didn't want to generate enough pressure to do damage,) I believe it also created enough pressure to force the caulk up into the leaks.

Typo Lake is down, by the way.  Way down.  Damn this drought.

Sunday, August 26, 2012

Leaky Daggerboard Trunk and Other Rites of Passage


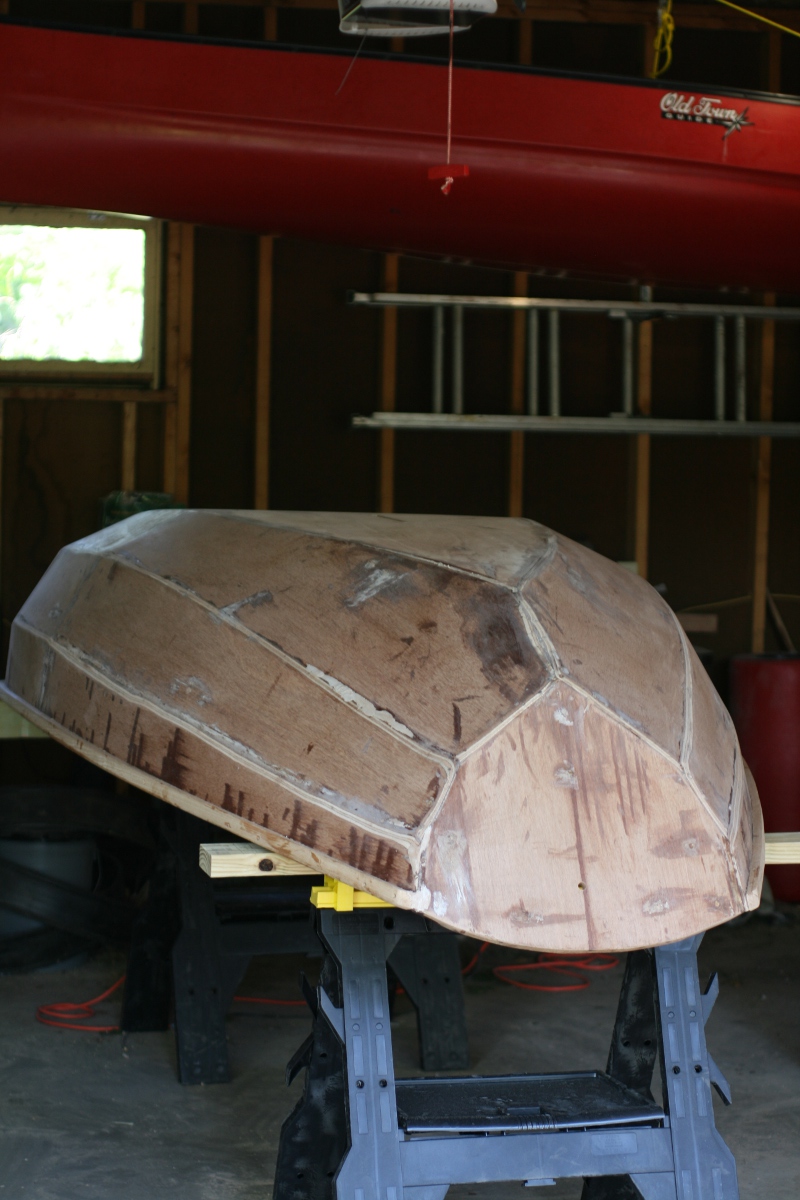
First outing was about ten minutes on Typo Lake, where we discovered a small leak in the daggerboard trunk. It sounds like most suffer from this to begin with as the trunk is prone to jostle and the layer of bedding compound is very thin and narrow. Think it's coming up around the bedlogs mostly. Jammed it somewhat by sealing up the underside of the daggerboard socket with duct tape, dusting the leaky areas with wood putty powder and then throwing in some water, allowing it to leak in.
Second outing was on White Bear Lake, where we discovered the oars were in bad need of wrapping and the middle seat snapped under the rower's weight (half suspected this would happen as we routed the hole for the daggerboard a bit too long.) Wrapped the oars with 1/4" rope with a manila cap, cut a new seat and added a cedar support block in the middle to support the rower's weight.
Third test was on Martin Lake. Ended up seizing the halyard and boom to the mast when underway and not sailing to prevent it from draping across the boat and getting in the way. Rowing was much better, but the daggerboard got jammed on some of the resin we'd aplied, so the total sailing portion of the voyage was about fifteen minutes give or take as we made signifant leeway. Planning on sealing the inside of the boat with 5800 marine sealant, and then sanding down the inside of the trunk and sealing it up with resin now that I have a better idea where the leak is coming from. May use blocks of the soft packing foam to really apply pressure to get the epoxy in there and apply two layers, really getting it good and solid before sanding it down. May have a proper workflow down by mid-Fall.

Sunday, August 19, 2012

Almost Got Her Out

While the gunnel guards took a few hours to install, I got a pretty good workflow going using a pair of clamps to stretch the guard out and a third to hold it tight a quarter inch from where I intend to sink a pilot hole/screw.

Took her out for a float test on Typo Lake; one small drip where the centerboard meets the midships frame; threw two layers of glass down on the inside seam and a layer of epoxy where it abuts the deck.

Thursday, August 16, 2012

Just about Done

Just stepped the mast yesterday. Since the last post, I've:

  • Painted the insides (I only gave this about 5 coats as opposed to the 12 on the outside; I'd like to leave a bit of a rougher finish for traction anywhere crew are going to step.)
  • Painted the daggerboard and rudder (and added hardware for both)
  • Painted the numbers (surprisingly more tedious than it seems.)
  • Installed the foam for the seats (call me cheap, I bought standard insulation and waterproofed and sealed it.)
  • Finished the mast
  • Finished the yards
  • Finished one of the oars
Just have the gunnel guard left to add and she's done.

Sunday, July 29, 2012

The Final Countdown

Sanded down the inside of the boat, and got the first layer of white on there. Unfortunately, it revealed several screw holes that blended right in with the mahogany. Going to have to putty those up.

Saturday, July 28, 2012

The Joys of Brass

Mounted the brass rub rail along the keel. Screwing soft brass through slightly harder brass into moderately hard oak is NOTHING if not loads of fun (and pre-drilling! and cursing!) Last strips of red along the side. Tomorrow I'll start finishing its insides.

Sunday, July 22, 2012

Progress this weekend

Put on the first three layers of the red along the top strip. The blue you see is painter's tape. Never mind the messy garage; I generally don't clean up until the end of the day. Completed this weekend:
* Finished white top coat
* Started red strip
* Mounted oarlock blocks
* Have the yardarm and boom roughly circular
* Finished the daggerboard
* 90% done with the rudder.

Still to do:
* Finish the outer paint
* Sand inside
* Paint inside
* Mount the oarlocks
* Paint the guard rail
* Mount the rudder
* Drill stations in the Daggerboard

Sunday, July 1, 2012

Putting the name on the Nutshell Pram

Three hours in the 90 degree heat with a very small paintbrush was, in all likelihood, worth it. Boat is getting insanely close to being completed. Included in this picture: my wife's gardening knee pad. Thanks to it I can still stand like a hominid.

Tuesday, June 19, 2012

Gilding the Lily

About 80% done on the Amanda Louise's dagger board cap ornamentation. Ordinarily, this sort of thing would only be reserved for the figurehead and stern transom.

Sunday, June 10, 2012

Priming the Nutshell Pram

When it comes to boat building, there's little that is more exciting, glamorous or all-around romantic than priming. There's the prepping, the mixing, the rolling, the blast oven that was my garage this weekend, the process of sanding and checking and repairing small scuffs and nicks with auto body repair gel; the smell of the primer (part of a balanced breakfast; the component list includes butane and calcium,) the smell of acetone, washing brushes and buckets and roller pans.And now I've got a boat with three solid coats of pollution grey that I will never see again once the paint goes on. A weekend well spent.

Sunday, June 3, 2012

Time Lapse of Carving Name on Boat

Used a dremel tool with engraving and grinding bits I carved the name into the back of the pram, then washed her down with denatured alcohol and sealed her with a very light layer of epoxy.  Spent about three hours on the garage floor.  Sweet fancy Moses, I hope my knees forgive me one day.

Sunday, May 13, 2012

Mast Step Reinforcement


Considering how thin the mast step is along the bow transom, we thought it might be a good idea to reinforce it with a small oak block. My father cut it, I routed and polished it up. Ready to be mounted.

Saturday, May 12, 2012

Building the Nutshell Pram

Puttied up screw holes, polished down the hull and seats with 220 and 400-grit sandpaper, coated the seats in three coats of high-gloss varnish.

Seldom get a good, full-body shot of the boat. Here she is, seen from the prow. Note that the hole in the bow transom supports the painter; a rope tied to the forekeel.

Saturday, April 28, 2012

Mast-Making: The Eureka Moment


I've tried various things to clamp my mast in place while allowing it enough give to turn when a reasonable degree of pressure is applied.

I attempted to clamp it (this failed; every clamp in my arsenal is intended to attach rectangles to other rectangles; they either fall off or need to be constantly adjusted.)  

I attempted to screw its ends into sawhorses and make it turn like a 10' lathe (the screws came loose or simply snapped.)

May have found a simple solution; place the mast on the sawhorse and sandwich it between two chunks of 2X4.  Adding a shop cloth makes it a little less wobbly and protects against gouging and scratching.

Wednesday, April 25, 2012

Mast Making: Knotty Procedures

I'm not sure if there's a SOP for knots when it comes to mast making. Perhaps the protocol is "just don't buy wood with knots in it." Perhaps making a mast out of a recently felled Sitka Spruce (as opposed to a kiln-dried construction-grade 4X4) would make the knots less likely to rattle their way out as the mast is shaved and sanded into shape.

I personally chose to ignore some knots (like the top one) because they were too shallow to be much of a consideration. One other (the one at bottom) was too deep to be ignored, and has been braced with epoxy and a little scrapwood.If the mast breaks in the middle of the lake and someone takes a gaff to the eye (and dies,) I guess we'll know I did something wrong.

Tuesday, April 24, 2012

There's Little Difference Between Tradition and Frugality


Just finished fine-tuning the form of the pram's rudder on my grandfather's old hobby saw. Beveled it down with a 60 grit on my RO sander, then polished it up with a 120 grit.

Mast Making (cont)

Found that drawing a circle on either end of the mast can be extremely helpful in getting a general idea of its curvature in relation to your notion of a perfect circle.