

Showing posts with label nutshell pram. Show all posts
Showing posts with label nutshell pram. Show all posts
Wednesday, September 19, 2012
Building the Nutshell Pram - Finishing Work
Just posted my video on completing the Nutshell Pram: http://www.youtube.com/watch?v=rGAQOQ_2Bpc
Sunday, September 16, 2012
Maiden Voyage of the Amanda Louise
Sept 15 - tested her out on WBL. Actually got the sails up and the daggerboard down. She handles very well in light winds, and rows quite comfortably as well. I do like the oars as compared to a motor as they're easy to swing down if you have to get moving or need a bit of help shifting tacks (which you may in a very light wind.) No engine to get started/monkey with.
I would definitely recommend an extra set of oarlocks (which I installed on mine,) as they allow you to a convenient spot to stow the oars while you're under sail. Would also recommend adjusting the tiller so it swings... if you go with the recommended build, whoever sits in the back is going to have to constantly shift to get out of its way. Only major concern is the fact that the sail obstructs the view, a problem we resolved by occasionally ducking around it.
I would definitely recommend an extra set of oarlocks (which I installed on mine,) as they allow you to a convenient spot to stow the oars while you're under sail. Would also recommend adjusting the tiller so it swings... if you go with the recommended build, whoever sits in the back is going to have to constantly shift to get out of its way. Only major concern is the fact that the sail obstructs the view, a problem we resolved by occasionally ducking around it.
Monday, September 3, 2012
Successful Float Test!

I then applied a duct tape patch to the daggerboard socket at the bottom of the boat and the top of the trunk, leaving just enough room for a duct tape-wrapped tube, which I connected to a shop vac. I threw the shop vac on reverse, and while there were a few leaks allowing the air to get out (which I wanted... didn't want to generate enough pressure to do damage,) I believe it also created enough pressure to force the caulk up into the leaks.
Typo Lake is down, by the way. Way down. Damn this drought.
Sunday, August 26, 2012
Leaky Daggerboard Trunk and Other Rites of Passage


Sunday, August 19, 2012

Almost Got Her Out

While the gunnel guards took a few hours to install, I got a pretty good workflow going using a pair of clamps to stretch the guard out and a third to hold it tight a quarter inch from where I intend to sink a pilot hole/screw.
Took her out for a float test on Typo Lake; one small drip where the centerboard meets the midships frame; threw two layers of glass down on the inside seam and a layer of epoxy where it abuts the deck.
Thursday, August 16, 2012
Just about Done

- Painted the insides (I only gave this about 5 coats as opposed to the 12 on the outside; I'd like to leave a bit of a rougher finish for traction anywhere crew are going to step.)
- Painted the daggerboard and rudder (and added hardware for both)
- Painted the numbers (surprisingly more tedious than it seems.)
- Installed the foam for the seats (call me cheap, I bought standard insulation and waterproofed and sealed it.)
- Finished the mast
- Finished the yards
- Finished one of the oars
Just have the gunnel guard left to add and she's done.
Sunday, July 29, 2012
The Final Countdown
Sanded down the inside of the boat, and got the first layer of white on there. Unfortunately, it revealed several screw holes that blended right in with the mahogany. Going to have to putty those up.
Saturday, July 28, 2012
The Joys of Brass

Sunday, July 22, 2012
Progress this weekend

* Finished white top coat
* Started red strip
* Mounted oarlock blocks
* Have the yardarm and boom roughly circular
* Finished the daggerboard
* 90% done with the rudder. Still to do:
* Finish the outer paint
* Sand inside
* Paint inside
* Mount the oarlocks
* Paint the guard rail
* Mount the rudder
* Drill stations in the Daggerboard
Sunday, July 1, 2012
Putting the name on the Nutshell Pram

Tuesday, June 19, 2012
Gilding the Lily
Sunday, June 10, 2012
Priming the Nutshell Pram

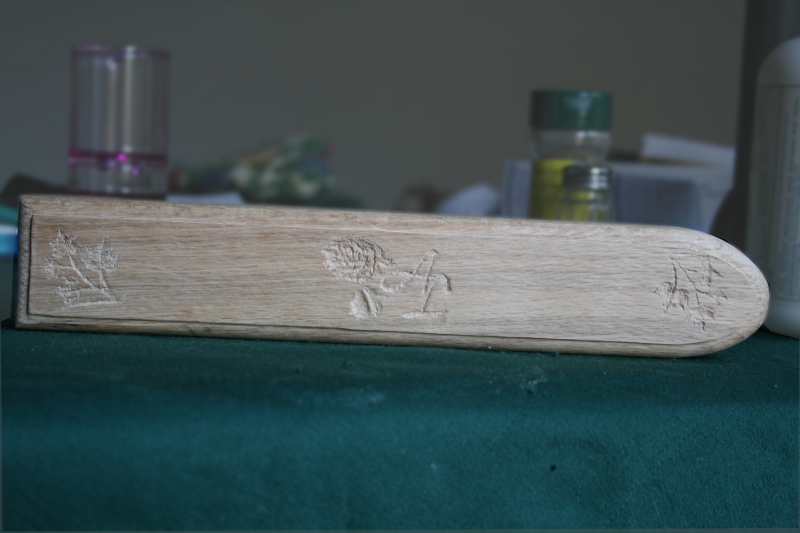
Sunday, June 3, 2012
Time Lapse of Carving Name on Boat

Sunday, May 13, 2012
Mast Step Reinforcement

Considering how thin the mast step is along the bow transom, we thought it might be a good idea to reinforce it with a small oak block. My father cut it, I routed and polished it up. Ready to be mounted.
Thursday, May 10, 2012
Mast Building: Getting it to fit in the mast step
Spent about an hour and a half whittling it down with a power planer and random orbit sander to get it to fit in the mast step. Next time going to save myself the time by originally cutting the mast about 1/10th smaller than is absolutely needed. Will also help make way for the varnish.
Saturday, April 28, 2012
Mast-Making: The Eureka Moment

I've tried various things to clamp my mast in place while allowing it enough give to turn when a reasonable degree of pressure is applied.
I attempted to clamp it (this failed; every clamp in my arsenal is intended to attach rectangles to other rectangles; they either fall off or need to be constantly adjusted.)
I attempted to screw its ends into sawhorses and make it turn like a 10' lathe (the screws came loose or simply snapped.)
May have found a simple solution; place the mast on the sawhorse and sandwich it between two chunks of 2X4. Adding a shop cloth makes it a little less wobbly and protects against gouging and scratching.
Wednesday, April 25, 2012
Mast Making: Knotty Procedures
I'm not sure if there's a SOP for knots when it comes to mast making. Perhaps the protocol is "just don't buy wood with knots in it." Perhaps making a mast out of a recently felled Sitka Spruce (as opposed to a kiln-dried construction-grade 4X4) would make the knots less likely to rattle their way out as the mast is shaved and sanded into shape.
I personally chose to ignore some knots (like the top one) because they were too shallow to be much of a consideration. One other (the one at bottom) was too deep to be ignored, and has been braced with epoxy and a little scrapwood.If the mast breaks in the middle of the lake and someone takes a gaff to the eye (and dies,) I guess we'll know I did something wrong.

I personally chose to ignore some knots (like the top one) because they were too shallow to be much of a consideration. One other (the one at bottom) was too deep to be ignored, and has been braced with epoxy and a little scrapwood.If the mast breaks in the middle of the lake and someone takes a gaff to the eye (and dies,) I guess we'll know I did something wrong.

Tuesday, April 24, 2012
Mast Making (cont)
Found that drawing a circle on either end of the mast can be extremely helpful in getting a general idea of its curvature in relation to your notion of a perfect circle.
Monday, April 23, 2012
Mast making Pt 4: Getting the Mast to Turn (Controllably) while working on it.
I've tried a lot of ways of anchoring the mast, and generally speaking, if you're not too worried about turning it while you're working (this is almost a must when sanding,) I found that l-clamps work the best. During the sanding process, I attempted to screw it into the saw horses. This was somewhat difficult as getting it screwed into the center point of the mast was difficult, and depending on which way you turn, the screws will generally want to either want to tighten or come loose. That being said, it worked alright.
Here's the process I used:
Here's the process I used:
- Center the sawhorses, and make a lateral line on them.
- Measure up a certain amount from the floor. Where this line crosses the lateral line, drill a hole. Make sure the hole is level.
- Drill a level hole through the centers of the mast.
- Screw through the sawhorses into the center hole of the masts.
This is really pretty simple, though I could have improved it by using bolts and washers (to allow the bolts and mast to turn together,) and by bracing the horses with sandbags to keep them steady.
Update: This failed. Badly. The screws came loose or snapped altogether. Considered bolts, but this would have meant boring fairly large holes into the ends of the mast. Figured out a fairly simple solution here.
Update: This failed. Badly. The screws came loose or snapped altogether. Considered bolts, but this would have meant boring fairly large holes into the ends of the mast. Figured out a fairly simple solution here.
Subscribe to:
Posts (Atom)